
Barcode scanning turns warehouse work from slow and error-prone into fast, accurate, and auditable operations. In Odoo 18, the Barcode app (integrated with Inventory) lets you scan products, locations, lots/serials, operation commands and process receipts, deliveries, transfers, and inventory counts right from the warehouse floor. This guide shows you exactly how to set it up and use it, with clear steps, real examples, troubleshooting tips, and SEO-friendly notes so you can publish confidently.
Note: UI labels can look slightly different depending on your edition (Community vs Enterprise), installed apps, or customizations. The steps and concepts below apply to Odoo 18 standard installations.
Why use barcode scanning in Odoo 18?
- Speed: scan-to-process is much faster than manual lookup.
- Accuracy: fewer picking/packing/receiving errors.
- Traceability: instant lot/serial history and location tracking.
- Real-time inventory: updates occur at scan time (no double entries).
Before you start — prerequisites checklist
- 1. Odoo 18 with Inventory (and Barcode features) enabled.
- 2. Products created in Odoo with a Barcode field populated.
- 3. Locations (storage bins) created if you use bin-level tracking.
- 4. A compatible scanner (USB/Bluetooth/mobile device) or Odoo IoT Box if you need native device integration.
Step-by-step: Setup & configuration
Step 1 — Install / enable the Barcode functionality
- Go to Apps → install Inventory (and the Barcode feature will be available once enabled in Inventory Settings).
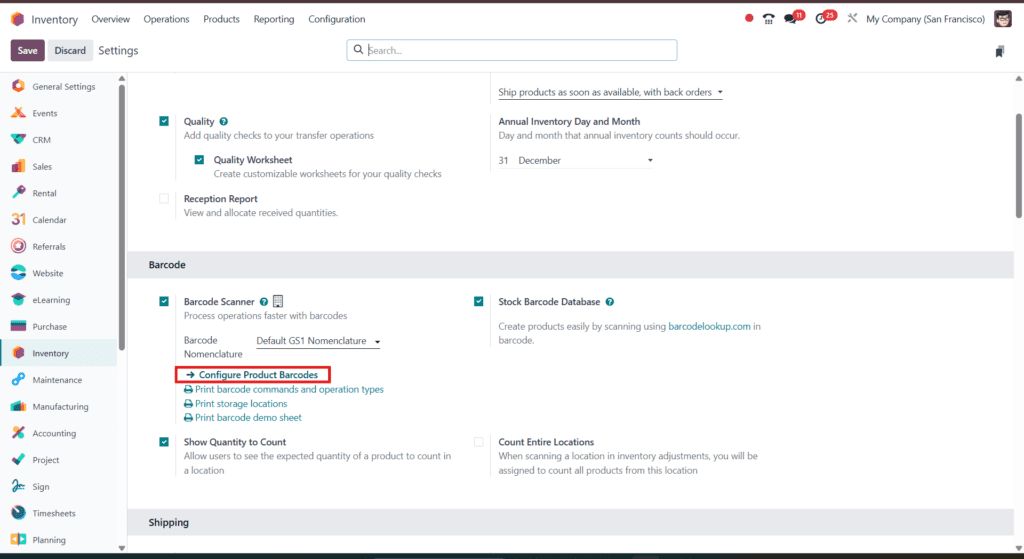
- In Inventory → Configuration → Settings, scroll to the Barcode section and tick Barcode Scanner (this installs/activates the Barcode app and the scanning features). Save.
Why this matters: Enabling the feature gives you the dedicated Barcode UI and access to barcode nomenclatures, commands, and the mobile scanning interface.
Step 2 — Choose your barcode nomenclature

- Still in Inventory → Configuration → Settings → Barcode section, choose Default or GS1 nomenclature depending on your barcodes.
- If you use retail UPC/EAN/GTIN codes, pick GS1 for automatic parsing (dates, lot, weight, etc.).
Pro tip: GS1 is ideal for supply chains where standardized GTINs/SSCC/lot data must be parsed; Default works for internal/custom barcodes.
Step 3 — Add barcodes to products, locations and operations

- Products: Inventory → Products → Products → open a product → paste/scan code into the Barcode field. You can also configure barcodes in bulk from Inventory → Configuration → Settings → Configure Product Barcodes.
- Locations (bins): enable Storage Locations then add a barcode to each location (so staff can scan “WH/ROW/A/BIN” instead of typing). You can print location barcode sheets from the Settings page.
- Operation types & commands: print the operation type and command barcodes (Receipts, Deliveries, Internal Transfers, Inventory Count) from Inventory Settings → Print barcode commands and operation types.
Step 4 — Pick compatible hardware & connect it
Common options:
- USB ‘keyboard wedge’ scanners: plug into USB, they act like keyboard input — easiest for desktops/tablets.
- Bluetooth HID scanners: pair with laptop/tablet like a keyboard.
- Mobile computers / handhelds with Android/iOS: run the Odoo mobile Barcode app or browser-based scanner.
- IoT Box (Odoo IoT / Windows IoT) — recommended if you want tightly integrated peripherals (USB/Bluetooth printers, scanners, scales) and device management.
Quick setup tip: If your scanner acts like a keyboard, you usually only need to open the Barcode screen in Odoo and scan. If you use IoT or specialized devices, follow the IoT setup docs to register the device.
Advanced features & tips
Barcode lookup / create products by scanning
If you enable the Stock Barcode Database lookup, Odoo can auto-fetch product data for known UPC/EAN/ISBN codes, and even create product entries during a transfer by scanning unknown barcodes (helpful for receiving supplier items). Note: self-hosted or Odoo.sh instances may require an API key.
Lot & serial scanning
Scan the product then the lot/serial barcode — Odoo will attach the lot/serial to the move automatically and keep forward/backwards traceability. This is essential for recalls and expiry tracking.
Use operation & command barcodes to speed processes
Print the operation command barcodes (Pick/Put/Pack/Validate/Produce) and paste them on racks or workstations so staff can scan a command and immediately trigger the correct workflow.
Common problems & troubleshooting
- Scanner types as wrong characters: check keyboard layout (e.g., QWERTY vs AZERTY) and scanner prefix/suffix settings.
- Scanner not connecting: verify Bluetooth pairing or USB drivers; test on a simple text editor to ensure scanner outputs characters.
- Scans not found in Odoo: confirm product barcodes are filled in the product form or that GS1 parsing settings match your labels.
- If using IoT: confirm the IoT device is visible in IoT → IoT Devices and assigned to the correct POS / Inventory settings.
Best practices (warehouse & labeling)
- Use clear location naming and print location labels for quick scanning.
- Prefer GS1/GTIN for supplier interoperability; use Default nomenclature for internal barcodes.
- Use lot/serial tracking for regulated or high-value items.
- Test scans end-to-end (scan → process → validate) before full roll-out; pilot with one warehouse.